You have a tattoo idea floating around in your head. Maybe it's been there for weeks, maybe years. But there's a gap between "I want a tattoo of..." and walking into a shop with a design you're confident about. Most people skip the design process entirely and hope their artist reads their mind. That rarely ends well.
This guide walks through the full process of designing your own custom tattoo, from a vague concept to a finished design ready for ink. And if you want to see your ideas come to life before committing, Negink can generate custom AI tattoo designs in 10 authentic styles in seconds, so you can explore directions before ever booking a session.
Start With Your Concept
Every tattoo starts with an idea, but "I want a nature tattoo" isn't a concept yet. It's a direction. Before you touch pen to paper or open any design tool, spend time getting specific.
Ask yourself these questions:
What's the core meaning? A memorial tattoo for your grandmother is fundamentally different from a tattoo that represents your love of hiking, even if both involve flowers. The meaning drives every design decision that follows.
What's the subject? Narrow it down. Not "nature" but "a single oak tree." Not "music" but "a vintage microphone wrapped in sheet music." Specificity is what turns generic tattoos into personal ones.
What's the feeling? Do you want it to feel bold and powerful, or quiet and intimate? Aggressive or peaceful? Playful or serious? This emotional direction shapes your style choice later.
Is there a story? The best custom tattoos encode a personal narrative. A compass pointing toward a specific set of coordinates. A date hidden in Roman numerals within a design. A flower that only grows in your hometown. These details make a tattoo yours.
Write it all down. Even a rough paragraph describing what you want and why is more useful than any Pinterest board.
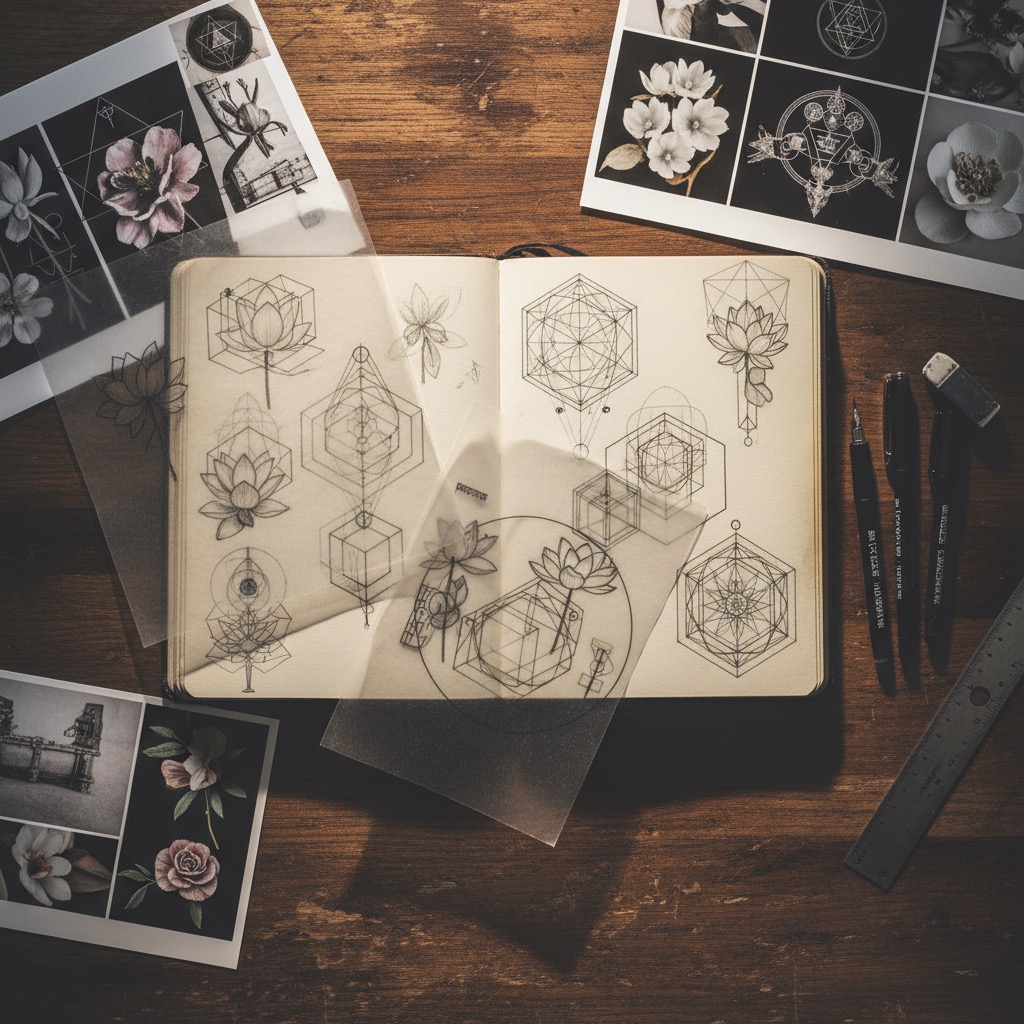
Build a Reference Collection
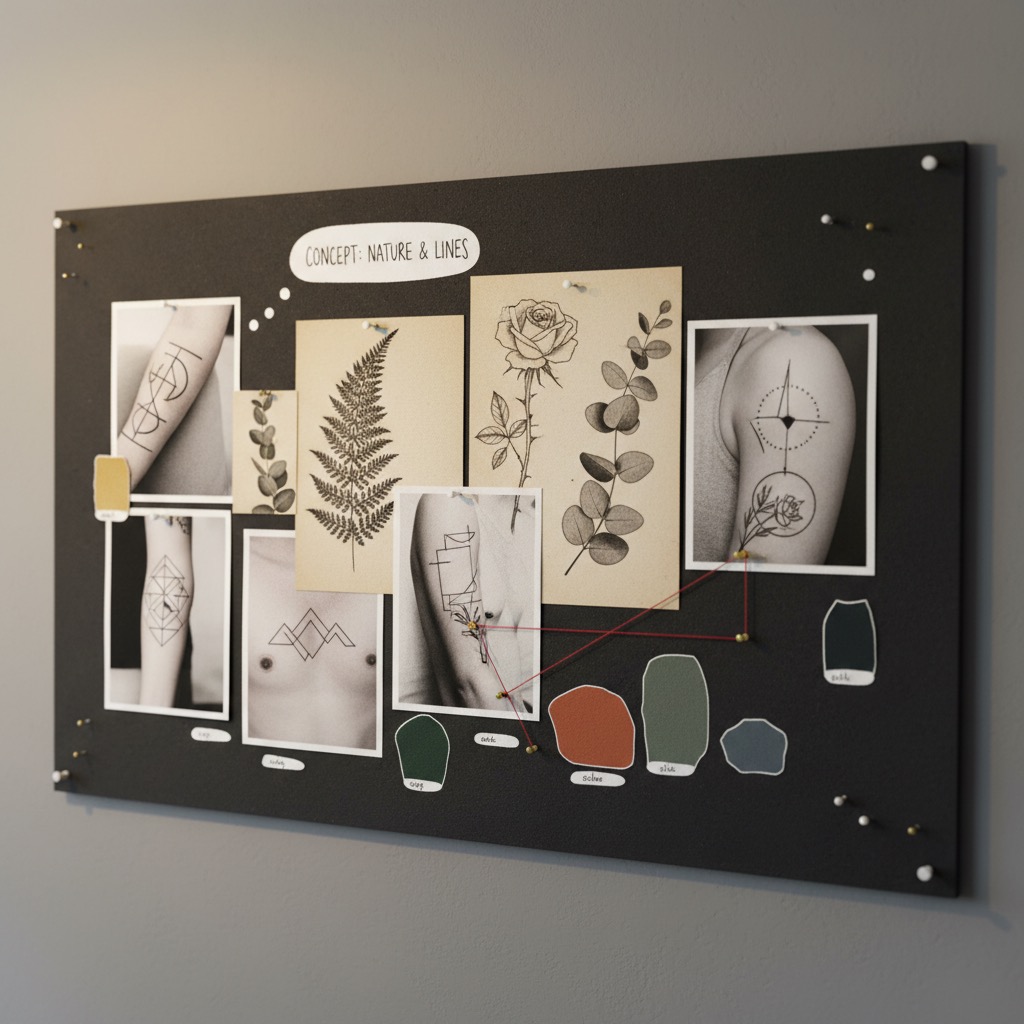
Now that you know what you want to say, start collecting visual references for how to say it. This isn't about finding a tattoo to copy. It's about understanding what you're drawn to visually.
Collect broadly at first. Save anything that catches your eye: tattoos, illustrations, photographs, paintings, textures, patterns. Don't filter yet. You're looking for patterns in your own taste.
Organize by category. After you've saved 30-50 images, sort them into groups:
- Subject matter (what's depicted)
- Style (how it's drawn)
- Composition (how elements are arranged)
- Mood (how it feels)
Identify what keeps showing up. Maybe you saved 20 images and 15 of them use thin, delicate lines. That tells you something. Maybe every image you saved is black and grey. Maybe everything has organic, flowing shapes rather than rigid geometry.
Include non-tattoo references. Some of the best tattoo references aren't tattoos at all. Botanical illustrations, architecture photography, album covers, vintage engravings, textile patterns. These give your artist fresh visual language instead of recycled tattoo designs.
Your reference collection is a visual vocabulary. The more specific it is, the easier every subsequent step becomes.
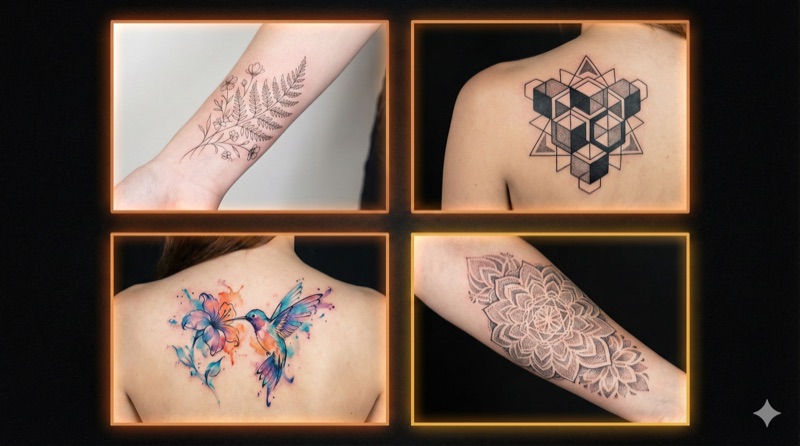
Choose Your Style
Style is the single biggest decision in tattoo design. The same subject (say, a rose) looks completely different in fine line versus traditional versus geometric versus watercolor. Each style carries its own visual weight, cultural context, and aging characteristics.
If you haven't already, read through the 10 most popular tattoo styles to understand your options. You can also browse our 50 minimalist tattoo ideas for inspiration if you're drawn to simpler designs. Here's how each style influences the design process:
| Style | Design Approach | Best For |
|---|---|---|
| Fine Line | Detailed, precise sketching | Delicate subjects, small placements |
| Blackwork | Bold shapes, high contrast | Statements, cover-ups |
| Minimalist | Reduction to essentials | First tattoos, subtle meaning |
| Traditional | Bold outlines, flat color | Timeless icons, sleeves |
| Japanese | Large flowing compositions | Body suits, storytelling |
| Watercolor | Loose, painterly rendering | Artistic expression, color |
| Geometric | Mathematical precision | Patterns, sacred geometry |
| Realism | Photographic accuracy | Portraits, memorials |
Don't force a mismatch. A photorealistic portrait won't work as a tiny wrist tattoo. A detailed Japanese dragon won't work at 2 inches wide. Style and scale need to align.
Try before you commit. This is where AI tools become genuinely useful. Instead of imagining how your concept might look in watercolor versus geometric, you can generate both and compare.
Describe your concept, pick a style, and see the result in seconds. Try the same idea across multiple styles. You'll quickly discover which direction feels right, which saves weeks of back-and-forth later.
Consider Placement and Size

Where a tattoo goes changes how it's designed. Placement isn't an afterthought; it's a core design constraint.
Body flow matters. The best tattoos work with the body's natural curves. A design on a forearm should follow its cylindrical shape. A shoulder piece should complement the deltoid's curve. Flat designs pasted onto curved surfaces look like stickers.
Size determines detail. This is a non-negotiable rule of tattooing: small tattoos cannot hold fine detail. Lines too close together will blur into a blob over time. A general rule: the smallest detail in your design should be about 2-3mm when tattooed. If your design requires intricate detail, it needs to be bigger.
Visibility and lifestyle. Think about your daily life. Do you want to see it yourself, or is it for others? Do you need to cover it for work? A forearm tattoo is visible in short sleeves. A ribcage piece is almost always hidden. Neither is better, but you should choose deliberately.
Pain tolerance varies by area. Bony areas (ribs, spine, feet, elbows) hurt more. Fleshy areas (upper arm, thigh, calf) are more tolerable. This shouldn't drive your decision, but it's worth knowing.
Common placements and what works on them:
- Inner forearm: Great canvas, visible to you, medium pain. Works well for text, small-to-medium designs, and anything you want to see regularly
- Upper arm/shoulder: Classic placement, easy to cover. Accommodates medium-to-large designs
- Back: The largest canvas on the body. Ideal for detailed, large-scale work
- Ribs: Painful but dramatic. Long, vertical designs work well here
- Wrist/ankle: Small, visible. Best for minimal designs
- Thigh: Large, flat surface. Excellent for detailed work with the option to cover easily
Create Your Design
This is where concept becomes artwork. You have several paths depending on your skills and resources.
Sketch It Yourself
You don't need to be an artist. Rough sketches communicate ideas. Draw the basic composition: where elements sit relative to each other, the overall shape, the proportions. Use tracing paper over your reference images to combine elements. Nobody will tattoo your sketch as-is, but it gives your artist a starting point.
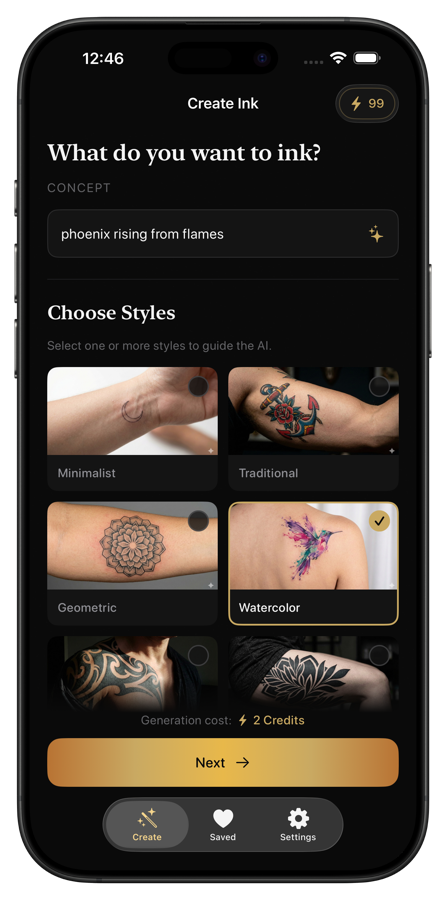
Use AI to Explore Directions
If sketching isn't your thing, or you want to rapidly test different concepts, AI tattoo generators can bridge the gap between idea and visual.
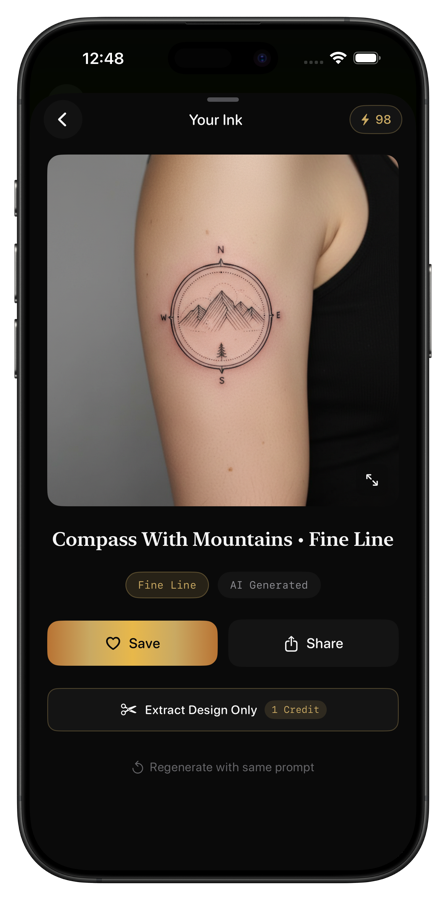
With Negink, you describe what you want ("a compass with mountains inside, fine line style") and get a custom design in 5-15 seconds. The app generates designs in 10 authentic tattoo styles and can preview them directly on a body, so you see how the proportions and placement actually look on skin.
This isn't about replacing your tattoo artist. It's about showing up to your consultation with concrete visual references instead of trying to describe something you can only see in your head.
Commission a Custom Design
Some tattoo artists design from scratch as part of their process. Others prefer clients to bring references. Either way, the more preparation you've done (concept, references, style preference, placement, size), the better the result.
Refine and Iterate
Your first design attempt won't be your final one. That's normal. Good tattoo design is iterative.
Live with it. Print your design (or save it on your phone) and look at it every day for at least a week. What you love on day one might bother you on day five. Details you missed will jump out with fresh eyes.
Get feedback, selectively. Show it to one or two people whose taste you trust. Not a committee. Too many opinions create design-by-committee results that satisfy nobody. Ask specific questions: "Does this feel balanced?" is more useful than "What do you think?"
Simplify. Almost every first draft has too much going on. Remove elements that don't serve the core meaning. If you can take something out and the design still communicates what you want, remove it. In tattooing, less almost always ages better than more.
Check at actual size. Print or display the design at the size it'll be tattooed. What looks great on a computer screen might be too detailed at 3 inches wide, or too sparse at 8 inches. Size reveals problems that zoom hides.
What to Bring to Your Artist Consultation

When you book your consultation, come prepared. The more clearly you communicate your vision, the better your artist can execute it.
Bring these:
- Your reference collection. The organized mood board you built earlier. Show what you like and explain why
- Your concept description. The written paragraph about meaning, story, and feeling
- Any designs you've generated or sketched. AI-generated designs, rough sketches, anything visual that communicates your idea
- Placement preference. Know where you want it and be open to your artist's suggestions about sizing
- Style preference. Name the style (or styles) you're drawn to
- Budget range. Custom work takes time. Knowing your budget helps the artist scope the design appropriately
Don't bring:
- A finished design you expect tattooed exactly as-is (unless it's specifically commissioned tattoo flash). Your artist needs room to adapt the design for skin
- 200 unorganized Pinterest screenshots. Curate. Quality over quantity
- Someone else's custom tattoo that you want copied. Respect other people's original work
Ask your artist:
- How they'd approach your concept
- Whether the size and placement work for the level of detail
- How the design will age over time
- What they'd change or suggest
A good artist will have opinions. Listen to them. They understand what works on skin in ways that screens and paper can't show.
Common Design Mistakes to Avoid
Too much detail, too small. The number one design mistake. That intricate mandala looks stunning on screen, but at 2 inches on your wrist, it'll blur into an unreadable blob within five years.
Chasing trends. Tattoo trends come and go. Infinity symbols, dandelion-to-birds transformations, white ink tattoos. If a design is popular right now, think about whether you'll still want it in 20 years. Classic designs are classic for a reason.
Ignoring how skin works. Skin isn't paper. It stretches, ages, tans, and scars. Colors fade at different rates (reds and yellows fastest, black slowest). Fine lines spread over time. Your artist knows this; trust their guidance on what will hold up.
No negative space. Designs packed with detail and no breathing room look cluttered on skin. Negative space (the empty areas around and within a design) gives the eye places to rest and helps the design read clearly from a distance.
Skipping the body preview. A design centered on a piece of paper might not center well on your forearm. Always preview placement on the actual body area, either with a stencil, a temporary print, or a digital preview tool like Negink's body placement feature.
Frequently Asked Questions
How long does the tattoo design process take?
From initial concept to a design you're confident about: anywhere from a few days to a few months. Don't rush it. The tattoo is permanent; the design process shouldn't be. Most people find that 2-4 weeks of active designing (collecting references, sketching, iterating) produces the best results.
Should I design my tattoo myself or let my artist do it?
Both work. What matters is clear communication. If you design it yourself (or use AI-generated designs), treat it as a strong starting point that your artist will refine. If you let your artist design from scratch, invest time in communicating your concept, references, and preferences clearly.
Can I use an AI-generated design as my actual tattoo?
AI designs are excellent starting points and reference material. Most tattoo artists will want to redraw or adapt any design (AI or otherwise) to work optimally on skin. Bring AI-generated designs to your consultation as references showing style, composition, and direction.
How much does a custom tattoo design cost?
Many artists include design in their hourly rate or charge a deposit that goes toward the final price. Dedicated tattoo designers charge $50-300+ depending on complexity. Getting the design right is worth the investment, since it's far cheaper than a cover-up.
What if I change my mind after starting the design process?
That's exactly why the design process exists. Better to change your mind during the sketch phase than after the needle touches skin. If you're feeling uncertain, take a break. Come back to it in a week. If the excitement is still there, proceed. If it's not, trust that instinct.
Start Designing
The gap between "I want a tattoo" and "I love my tattoo" is filled by the design process. Skip it, and you're gambling. Invest in it, and you walk into the shop with confidence.
Start with your concept. Build your references. Try your ideas in different styles with Negink. Sketch, iterate, simplify. Then find an artist who's excited about your vision.
Your tattoo will be on your body for decades. Spending a few weeks on the design is the best investment you'll make. Learn more about Negink.
Related Articles
- 10 Tattoo Styles Explained: Find Your Perfect Match — Understand every major style before choosing yours
- 5 Ways to Preview a Tattoo Before Getting It — Test your design on your body before committing
- First Tattoo Tips: What to Expect at Your Appointment — What happens after you finalize your design
- 50 Minimalist Tattoo Ideas for Your First Ink — Inspiration for simple, timeless designs